Posts

Dome II - she lives!

Image
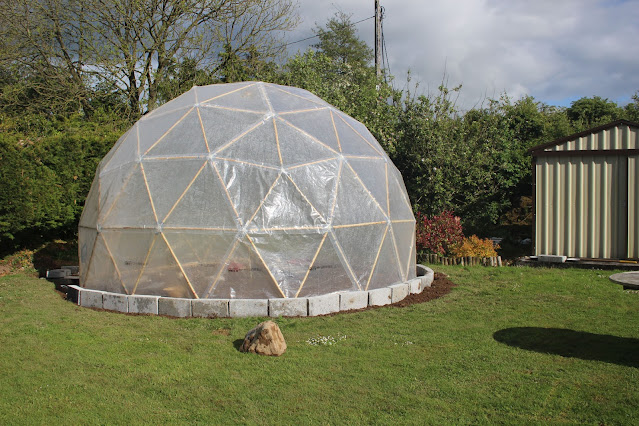
 Well....I did a lot of what I said I would after demise of DOME I in storm Barra 7/12/2021 and rebuilt the dome with only a few small repairs to the cover and a couple of bamboo poles. Somewhat bizzarrely , rather than using stacks of cement blocks to raise the dome to allow the underlying layer to be added....I happened to have a set of dining room chairs resting in my garage. Anyway, though this was a larger strain on the structure the vertical ,movement of the dome onto the chair seats could be acheived far more quickly than moving loads of blocks ...and so was a shorter and less periolous assembly. Second time around the slackening and straighten and re-tightening operation of each of the hexagonal and pentagonal connectors was realised more efficiently and I am convinced Dome II is more inherently stable than Dome I. With Polythene cover in place and raring to go. Only 2 or 3 days before annual holiday....so need to protect against wind catching under edge of dome and arrange...

Collapse of the Geodome

Image
 7th December 2021 Storm Barra hits Ireland. RTE news report of Storm Barra A bad day for the dome. I watched from the safety of the house to see the dome initially handle the buffetting of the high winds but eventually succumb to the forces of nature. Initial weathering of Storm Barra Eventually succumbing to extereme buffeting The storm was intense and ongoing for many hours on that fateful day. For many many hours the wind strengthened and waned changing direction as the storm passed over Ireland. The shelter from the surrounding buildings , trees and hedges protected the dome from the worst of the gusts of wind but at certain orientations the protection is very limited. It is difficult to know what the point of failure was.... During the storm it was unsafe to investigate , my sole activity being to dismantle / flatten the geodome remnants as portrayed above to try and prevent further damage and material flying away. However, it was clear that the frame had not broken as such.....

1st Season Geodome Report

Image
 Its been a few months since the completion of the Bamboo framed Polythene Skinned Geodome was constructed and I wanted to summarise how things went during the first season. Setup - Watering was supplied by an external tap / hose / battery operated timer and distribution kit as described below. Tuning in the amount of time the water was switched on, number of times per day, the size and drainage of each plant pot led to some plants being overwatered. After adjusting the sequenece over time the system worked very well ...even during the extended periods of absence from the house,dome. Environment Once the water was sorted the other big variablke is temperature. During sunny days the inside of the Geodome rose to the high 30's such that any work to be performed inside became almost impossible. (think Sauna!) During overcast / windy days the dome sat around the mid 20's and probably got no lower than 18 degrees or so during the Spring, Summer nights. Excellent growth conditions fo...

Covering the Geodome

Image
  The completed structure  So.....In the words of Talking Heads....How did I get here. From earlier posts you will have seen the assembly of the polythene cover unit cells of Hexagons, Pentagons and 1/2 Hexagons......that allow the build to be easier to visualise and ultimately build correctly. Using the UV resistant mega strong tape and the gadget below (see earlier post) start connecting the unit cells into bigger fragments. (the gadget will take the strain of when trying to form a 3D structure from flat sheets). Its easy to get lost so I'd recommend joining 5 pairs of 2 hexagon cells as the basic 5 vertical stripes that you have to joing together via intervening pentagons. The repetition of this operation will hopefully result in less (0 errors) Gadget developed to join flat sheets to form a 3D cell. Once the whole structure is completed ....wait for a dry, windless day and go for it. I was assisted by my daughter who kept tension on 2 ropes straddling the top of the geodom...

The Build

Image
Well ...at long last the weather has improved, the mists of apathy have subsided and whilst covid19 still has a stranglehold on the world....Ive concentrated on what's really important.....The Geodome. Whilst the skeleton remains uncovered (waiting for a dry windless day!) ,it in itself is a personal triumph after all these months of trying to get everything right.    From the outside the view is more appealing and quite the feat , built single handed due to covid19 restrictions. How? Well a quick glance at the following video will reveal all. In summary, the structure is flexible and wobbly until it is complete and all joints are tightened fully. This is both forgiving in terms of breakage etc but aggrivating in terms of handling and manipulation. The task is to build a layer under the preceding layer by raising the structure on concrete blocks (4" at a time....at a number of points on the circumeference to minimise the stresses and strains within the framework. There were mo...

March 10th - mid pandemic update

Image
 Progress has been slow but steady off-late thanks to non-deliveries of dowels from the UK (brexit) and a certain lack of focus from pandemic blues, for want of a better term. However, the current status is All sticks or struts  manufactured.  Polythene unit cells being assembled Site has been attacked with weedkiller and soil turned. Concrete blocks sourced. Numerous seeds are being cultivated in trays. Polythene Cover Cells So....after a couple of previous trials working with the original 'triangle' base units I quickly realised I could save a lot of time / effort and tape by making larger base cells. Whilst in theory it is possible to construct single cells from the core haxagons and pentagons I decided to use 1/2 heaxagon units due to difficulties in handling, lousy weather outside and therefore strict limitations on indoor area available to stretch out polythene film. The core thing about the hexagon patterns is that they are not real pentagons due to the raised cent...

Cover Material Arrives

Image
 Tuesday 16th Feb 2021 the polythene material for the geodome cover arrives.  Delivered by Liam of Allens of Allenbridge   by car. 13 m x 8m = 104 sq metres of high quality UV stabilised polythene. 9 rolls of 20m x 0.1m repair tape Material is light but very strong and pretty much as expected. The rolls of tape are made in France and I'm assured stronger than the polythene it is designed to join. The tape is semi-transparent and also UV stabilised and hopefully will not stick out too much as the tape joins are coincedent with the spars (sticks) of the geodome structure.  In the next couple of days some initial trial will be run to assess the flexibility of the taped joints....which I think will determine the maximum size of the geodome cover sections. Update on the 'sticks' Well, I grew old and impatient waiting for the larger dowel diameters ordered a few weeks ago. Another victim of Brexit, the stick were apparently stuck in customs. Soooo....I cancelled the o...

Groundworks

Image
 Preparation of the ground to receive the dome is something I can start to consider given the fact I am waiting for some more dowel rods and the weather is slowly beginning too improve. This is a good approximation to the geodome structure....plan view. Some numbers to consider Perimeter for 5.2m diameter dome is 16.33m A standard concrete block 44cm x 22.15cm x 10cm 16.33 / 0.44 ~ 36 blocks ~ 10 degrees offset to form circle. (360 degrees) Photoshop Estimate Total no of blocks  36 circular plinth and 40 for perimeter wall. 

Door Proposal and General Update

Image
 Door Placement and Calculations Door will be formed a base heaxagon made up of the perimeter of 6 'B' s and the spokes of 6 'C' s. Doorway aperture ~ 1.82cm tall / 1.05cm wide I think this is a reasonable compromise between structural strength degradation, difficulty and comfort....ie some of us will have to stoop slightly to make the job considerably easier to complete. My primary school trigonometry suggests the 'hexagon centre height' is of the order of 20cm. So what does it look like and do the 'hubs' have enough play to form a rectangle in the centre of the would be hexagon.    The standard raised centre hexagon hub is removed on the right hand side and the central sticks re-aligned to form the rectanglular would-be door-frame ~ 1.8m tall.  So , it appears that all I have to do is make a couple of poles to form the doorframe plus a couple of short lateral posts to connect these poles 1/2 way up to the 1st horizontal row of sticks above ground level...

Cover Enquiry and Progress Report

Image
 Cover Enquiry Have discussed requirements with Polytunnels covering company located in County Cork. Recommended use of very strong UV proof Tape to join polythene triangles, just shy of 2 inches wide and 20 € per metre. This method is likely to be much stronger, faster and reproducible than the plastic welding method I had im mind up to this point, but Liam from Allens, Allenbridge advised that the tape is stronger than the polythene itself. So , how many joints are there. 165 sticks in construction So for this 5.2m diameter dome what does the cumulative lengths of the sticks come out as? Well using the calculator supplied by buildwithhubs.co.uk (download excel file from company) The number of sticks for a 5.2m diameter gedome and lengths is as follows.... A   sticks (short)   81.9cm     quantity 30 B   sticks (med)    96.2cm     quantity 55 C   sticks (long)    98.4cm     quan...

Preliminary Construction

Image
 Sanity Test Assembly Prior to continuing 'mass' production of the 'sticks' it seemed a good idea to assemble a hub or two to check that there were not gotchas in the process so far. I selected the topmost pentagon of the design....5 triangles of 2 short sticks (A) and 1 medium (B) were used. 5 'A' and 5 'B' sticks + kit Attach the Ball Joints to the 'sticks' Press the Ball Joint into the 'Hub' Complete all of the 'Hub' Connections and lock with washer, bolt and  winged nut. 5 satellite Hubs to form triangles complete the uppermost pentagon of the Geodome. There is plenty of freedom in the Hubs which will reduce as you tighthen the locking plates (washers) using the winged nut and bolt.  No Issues were seen as yet and I need to reread the Design Advisory notes as they recommend a max stick diameter of 3.4cm and from my version above....no such limitation comes into play. Looking at their publicity shot its possible that if the sti...

Construction of Sticks

Image
  Physical construction of bamboo. This results in the appearance of a solid core if your rod cut lies on a node. These are usually thin enough to be drilled out to reveal the natural diameter of the bamboo. Various dimensions and shapes OK, due to the construction of bamboo the plugging of the ends of the rods you cut is not so easy. The above shows a typical variation of what each rod end will present to be filled by a dowel trimmed to size. As you can see the sidewalls can be thin (2-3mm). While this is still mechanically very strong...especially under longitudinal forces...you can see that you cant just drill out irregular ends to form easily plugged circles. This means you need to have a lot of dowel diameters to hand and trim them to the irregularities of the bamboo. My Set up Gorilla Tape to wrap round ends of rods to protect against splitting. Wood Glue to secure dowel in bamboo rod. A variety of dowel diameters A sharp craft knife for scoring the inner rods. Hand-drill for...